Learning to do some house chores rids us of a lot of hassles. For example, if you do not know how to connect two faucet supply lines, you will have to depend on a plumber each time something goes wrong with them, not to mention the time and money that will go down. What if you knew how to do this?
The simplest method for you to connect two faucet supply lines is using a faucet compression fitting. It would help if you got the pipe’s measurement to purchase its matching fitting. The rest of the process – joining the lines together – will be as manageable as inserting and twisting. Nevertheless, you would still need to glance through the manufacturer’s instructions before purchasing the tools.
The discussion below will tell you how to set up supply lines in a step-by-step process. Read all of it to understand and learn the process to take matters into your hand!
How to Connect Two Faucet Supply Lines in Easy Steps?
Step 1: Turning The Water Supply Off
First, turn your water supply off. If otherwise, you cannot connect the two hoses due to the pressure. The water pressure will make the work more challenging while getting you wet. Plus, it’d be a waste. You don’t want that.
Step 2: Measuring The Water Supply Lines
To measure the lines, you need to see the distance between the faucet and the shutoff valve. Then, get the length and add three to five inches to the tubing to make room for angle and flexibility. Remember that it will vary because there are different supply lines available in the market.
Supply lines usually come with most faucets. Since you had to pay for them, make sure you use them when needed. However, the lines may not sometimes fit correctly. If they are short, you will need to buy a supply line extension.
Don’t worry because a water supply line extension does not have anything to do with causing water supply problems.
Step 3: Bending The Tubing
Ensure you do not bend both end sides because you will have to link them up with the faucet and the valve. Instead, do the bending so the tube ends have an appropriate angle with the faucet’s intake part and the valve.
Perfecting the bending depends mainly on the tube type. So, pick a bendable one to make a proper angle.
When you make the connection between the supply lines and the faucet and valve, you may have to put Teflon tape on the links. They are also called plumber’s tape. Plumbers use it to lubricate and bolt threaded line joints.
Here’s a bonus tip for you: You should keep your hot and cold water supply lines approximately half a foot separate from each other unless you have an insulated hot water supply line. That is necessary because you do not want the cold water line to take up the hot water line’s heat.
Step 4: Getting The Tools At Their Places
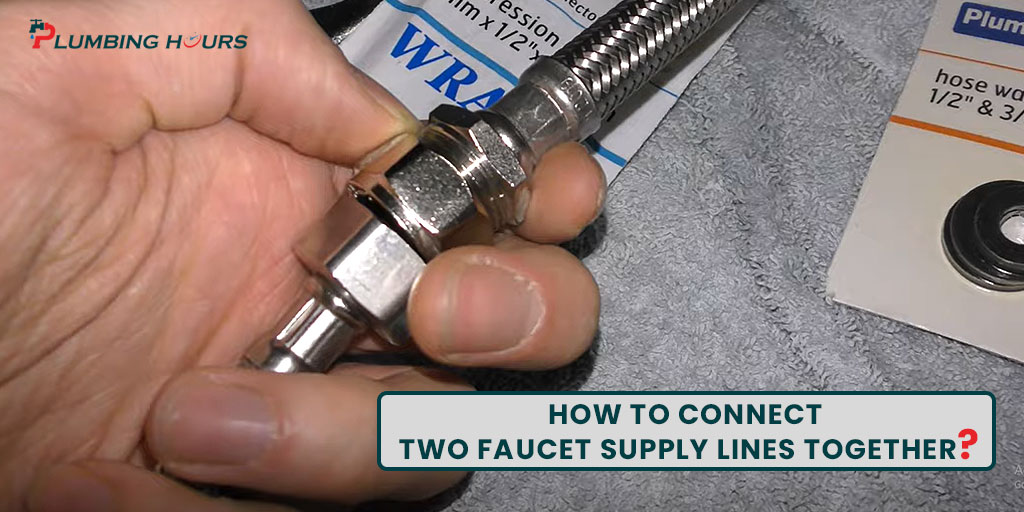
Now is the time to get the tools at their places. Place the locking nut of the faucet, the ring, and the compression fitting on the water supply line’s end. Remember to keep the line somewhere convenient since you still have not connected the tube with it.
Be careful while measuring the line diameters because you have to buy a compression fitting of the exact size to connect them. You can get the tools from the local hardware stores. If not, DIY and plumbing supply stores will have them for sure.
It is easy to install compression fittings. While they work better than most pipes and require low maintenance, they do not last as long as the soldered fittings. Besides, their chance of leaking is slightly higher. Notwithstanding that, they do a pretty good job for this purpose.
Step 5: Placing The Faucet
Here is the final step. Put the faucet on one of the tube’s ends. Tighten its nut after the placement. Now take the second end and fix it with the discharge port of the shutoff valve. Bolt it tightly, too.
It would be best if you used a basin wrench to tighten them. Put one twist on the faucet compression fitting while placing the other on the shutoff valve. Keep the valve held in its place. Then, turn the compression fitting clockwise.
You should connect the kitchen faucet connections sufficiently tight to prevent water leakage. But it cannot be too stiff. That raises the risks of loosening the supply line. So the best direction here is that you keep tightening it as long as you can afford it. Afterward, use the wrench for a half or last quarter turn.
To ensure you did it right, turn the water supply on and check the connections for water leakage. If they are tight and show no sign of leakage- congratulations! You did it! Now treat yourself to a cold drink and get a comfy nap.
How Much Is The Costing?
Connecting two hoses together is not that costly. You have to spend some money only on the tool and materials. The tool will cost you $20 at the most. The materials are a faucet, a locking nut, a ring, a tube, and a compression fitting.
The price of the faucet ranges from $100 and $400. Pick one you find suitable. The rest of the materials will not cost you more than $20. So, the least you have to spend is $150.
You Can Also Have A Look On:
How To Tighten Kitchen Faucet Nut Under The Sink?
Black Stuff Coming Out of Bathtub Faucet- (Causes & Solution)
Best Faucet for Pedestal Sink
How Much Time Does It Require?
If you plan to connect two hoses on your own, it will not take more than half an hour, depending on your experience. If you have already done it several times, it should take 15 minutes only. But if you are about to do it for the first time, you will need more time.
Calling a plumber will take around 10 to 12 minutes. Connecting dishwasher supply lines is not that difficult a job if you follow the steps right. You should get a plumber to do it only if you cannot do it after trying for some time.
Final Words
If you have read the steps thoroughly, I believe you are halfway through the process because understanding how to connect two faucet supply lines is the first step to start doing it for real.
You need to understand the process because you have to connect the faucet in the right way. If anything breaks or damages it, it will cause you to spend a fortune on it. And saving money is one of the purposes of doing it in a DIY method.
Always stay cautious while plumbing, especially during the first time. Doing anything wrong in the process can lead to flooding and massive damages. However, do not be scared of it. While some plumbing activities are very complex, establishing a water supply line extension is pretty simple.
Once you do the steps, you will get water coming out of your faucet within seconds. The hardest thing about making a faucet connector extension is knowing what to search for, which you know already.
Thanks for reading. Best of luck with fixing faucet supply lines!
Hi my family member! I wish to say that this post is amazing, great written and include almost all vital infos. I¦d like to see more posts like this .